

HOW TO STRENGTHEN YOUR BACK
simple exercises
HOW TO STRENGTHEN YOUR BACK
Strengthening Back pain muscles provides good support for the spine.
5 simple exercises to strengthen your back muscles and help prevent back pain.
If at any time you feel pain doing these stretches, be sure to stop; stretches should feel comfortable. Go slowly and let your body have time to stretch. You should feel the positive benefits the more you keep stretching
back.strengthening.exercises.the100
Targets: Abdominals
Equipment: Exercise mat
Level: Beginner
Benefits
The hundred is a dynamic warm-up for the abdominals and lungs. It requires that you coordinate your breath with the movement and be strong and graceful at the same time. The hundred recruits the abdominal muscles, including the laterals, and develops scapular and trunk stabilization. It is challenging, but the hundred is an easy exercise to modify if you have back or neck issues or you need to make it easier or more difficult.
Common Mistakes
Chin Pointed Up
With your head raised off the mat, you might find yourself with your chin pointed up at the ceiling. This increases the tension in your neck. Instead, it should be tucked down towards your chest, but still leaving enough room that you could be cradling an egg between your chin and your chest.
Legs Too Low
Don’t allow your legs to go too low and cause you to arch your back. If that happens you will be using your back muscles instead of your abs.
Safety and Precautions
If you feel any neck strain, return your head to the mat and do the hundred with your head on the mat. If you have a pelvic floor problem, you may wish to avoid the hundred as it places downward pressure on the pelvic floor.
After the mid-point of pregnancy, exercises such as the hundred where you are lying on your back should be avoided.
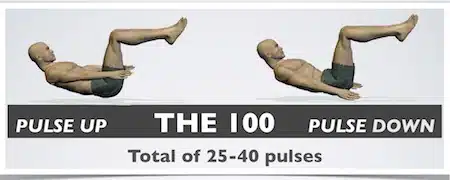
THE 100
Duration: 0.42
- Lie on your back, knees bent, arms flat by your side and palms down
- Engage your butt and pull your tummy in
- Lift one leg so shin is parallel to ceiling, knee directly above hip, press back to floor and lift other leg, head, neck, arms and gently pulse arms x 10, then turn palms to ceiling and pulse x 10. Do 100 if you can
Bridge Exercise

Targets:
Equipment needed: No equipment needed. Yoga mat optional to minimize back discomfort.
Muscles worked: This variation primarily targets your iliotibial tract and vastus lateralis.
Modifications and Variations
By slightly repositioning your body, you can create a number of different glute-bridge variations, like the single-leg glute bridge, side bridge and pelvic tilt to bridge, to target and emphasize different muscle groups. Add weight with a barbell or dumbbells resting on your hips, or a resistance band around your knees to activate your glutes more during these exercises.
It’s important that you perfect your technique before attempting any glute bridge variations so that you can get the most out of the exercise and prevent injury.
Repetitions:
Time: 15 – 20 minutes
Equipment: None
Instructions: For a full workout, complete each move for the indicated number of reps, before continuing to the next exercise. Perform the entire routine three times.
Common Mistakes
You Hyperextend Your Lower Back Don’t raise your hips too high. This means “your hips should be slightly lower than your knees and your shoulders at full extension at the top, s Instead of Your Heels
You Don’t Squeeze Your Butt at the Top Take a full two-second pause at the top of the movement, conscientiously squeezing your glute muscles together and under so that you’re getting a full contraction and shortening of the glutes
You Use Your Hips and Quads Instead of Your Glutes and Hamstrings Make sure you pause and tilt your pelvis under at the top of the movement, so your hip bones move more toward your abdomen.
You Plant Your Feet Too Close or Too Far From Your Butt Set your heels approximately 12 inches, or one foot, away from your butt.
You Don’t Engage Your Core Before you begin the exercise, brace through your core and pull in your abdomen so that you draw your hip bones upward and put your pelvis into a posteriorly rotated position.
You Don’t Tuck Your Chin You don’t have to tuck your chin a ton — just keep it angled down slightly at the top of the movement.

The bridge exercise focuses on glute strength but can also be modified to include the hamstrings and hips flexors as well.
If you are interested in a hip flexor stretch at the same time bring your feet together in the starting position and allows your knees to drop to each side. Bridge up with feet together and knees apart to feel a hip flexor stretch while strengthening the posterior chain.
Step-by-step directions
1. Single Leg Bridge
How to: Lay flat on your back with knees bent hip width and hands by your sides. Bring right knee into your chest and keep it in place. Keep your foot on the floor and knee bent. Engage your glutes and lift hips up as high as possible. Form a straight line from head to knees when you lift. Hold at the highest point for 2 to 3 seconds and lower back down to the floor. Perform 20 reps on each side.
2. Weighted Bridge
How to: Lie flat on your back with knees bent and feet hip width. Hold a weight on your hips and keep it in place using your hands to stabilize it the entire time. Engage the glutes to lift the hips up as high as possible (make sure the lift is coming from your glutes and not your low back by keeping back straight and core engaged). Return back to center and repeat the movement. Perform 10 reps.
3. Inverted Bridge
How to: Lie flat on your back with right foot on a stable bench or box. Bring your left knee into your chest and hold in place the entire time. Lift your hips up as high as possible, pressing your right foot into the bench to lift. Return back to the floor and repeat the movement. Perform 10 reps each side.
4. Narrow Bridge
How to: Lay flat on your back with feet and knees glued together the entire time. Engage your glutes and inner thighs as you lift hips up. Hold at the top for 2 to 3 seconds and then lower back down. Do not let the legs come apart. Perform 20 reps.
5. Bridge Pulses
How to: Lie on your back with knees bent, hands pressed into the mat and feet hip-width apart. Lift your hips up as high as possible. Lower your hips an inch then lift them an inch. Continue this small range of motion for 30 reps.
However you decide to incorporate the bridge exercise into your routine, it can help strengthen multiple muscle groups in your body, and offer a number of physical benefits.
Back Strengthening Exercises - Swimming

Targets:
Targets: Back extension, core, and butt muscles
Level: Intermediate
Pilates swimming is a fun mat exercise, but it is also quite challenging as it brings every part of the body into play.
Modifications and Variations
By slightly repositioning your body, you can create a number of different glute-bridge variations, like the single-leg glute bridge, side bridge and pelvic tilt to bridge, to target and emphasize different muscle groups. Add weight with a barbell or dumbbells resting on your hips, or a resistance band around your knees to activate your glutes more during these exercises.
It’s important that you perfect your technique before attempting any glute bridge variations so that you can get the most out of the exercise and prevent injury.
Repetitions:
Time: 15 – 20 minutes
Equipment: None
Instructions: For a full workout, complete each move for the indicated number of reps, before continuing to the next exercise. Perform the entire routine three times.
Safety and Precautions
You want to feel your back working, but not straining. You should use caution or avoid this exercise if you have a back injury. If you have neck pain, try keeping your arms by your sides or use them for light support as in the half swan.
Step-by-step directions
Before you embark on exercise check there are no medical reasons stopping you from doing so.
1. Lie face down and stretch your arms out in front of you palms down
2. Tighten your butt and tum. Slowly lift your right arm and left leg off the mat, lifting your head and neck slightly keeping your gaze down while stretching diagonally
3. Take a couple of breaths and slowly lower your arm and leg
4. Then swap to your left arm and right leg 5. Repeat x 2, trying to stretch a bit further each time
Benefits
This is a great exercise for your butt, lower back, and core. It uses the gluteus maximus muscle, and you’ll often find this exercise in workouts geared to give more definition to your butt. The hamstrings at the back of your thighs are used to lift your legs from the mat as well.
Swimming also targets the back extensor muscles. Strong back extensors are needed to reduce the tension in your neck and shoulders. They are a key component of the long spine position typical of Pilates exercises and will help you maintain good posture in daily life.
You will also be keeping your abdominals engaged throughout the movement, especially the obliques. Your abs work together with your back muscles to support your spine and neck so you aren’t trying to lift your upper body and head with your neck and shoulder muscles.
Common Mistakes
Always reach from your center, keeping your head and neck working as extensions of your spine. Watch out for these issues:
- Raised Tailbone
Protect your lower back by keeping your tailbone moving down toward the mat.
- Crunched Neck
Keep your face down toward the mat; don’t crane or strain your neck by trying to look out or up.
- Weak Core
Stop when you don’t have the core support you need to continue and you begin to lose your proper form and alignment (for example, lifted tailbone or hunched shoulders).
Swimming also targets the back extensor muscles. Strong back extensors are needed to reduce the tension in your neck and shoulders. They are a key component of the long spine position typical of Pilates exercises and will help you maintain good posture in daily life.
You will also be keeping your abdominals engaged throughout the movement, especially the obliques. Your abs work together with your back muscles to support your spine and neck so you aren’t trying to lift your upper body and head with your neck and shoulder muscles.
Back Strengthening Exercises - Roll Down

Targets:
Targets: Back stretch
Level: Beginner
Wall roll down is a simple standing mat exercise. Practice using your abs to achieve the articulated curve of the spine that is used so much in Pilates. It stretches the back and the hamstrings, as it works the abdominals, and teaches good posture. This is a good way to train for more challenging exercises like the roll up, where you also use the sequential activation of upper and lower abs to curl and un-curl the torso. You might practice it at home or as part of a warmup before a Pilates session.
Modifications and Variations
There are ways to change this exercise to make it easier to do as you are a beginner and to deepen it.
Need a Modification?
Modify wall roll down by only going down as far as you are comfortable. You can also bend your knees slightly.
Up for a Challenge?
You can do this exercise with raised arms to vary it. Before starting the roll down, raise your arms straight up over your head. As you roll down, keep your arms parallel to your ears. As you roll up, your arms travel alongside your ears and the shoulders stay relaxed. Finish with arms overhead with wide shoulders and an open chest.
A further progression is the standing roll down, done away from the wall.
Step-by-step directions
- Before you embark on exercise check there are no medical reasons stopping you from doing so. 1. Stand feet hip width apart
- Clench your butt and pull your tummy in
- Tuck your chin to your chest and roll down bone by bone
- Let your head pull you down, let arms hang loose, take a couple of breaths
- Slowly roll up into standing
Common Mistakes
This exercise is excellent for Pilates novices to practice activating the abdominals. As well as focusing on the abs, you also are concentrating on relaxing the shoulders, which is where many people store tension. You can use it as a stress-reliever at any time during the day. Scrunched up shoulders and tensed neck muscles contribute to poor posture.
The body awareness you develop will help you achieve better posture, take fuller breaths, and improve your walking form. This will help relieve strain throughout your back, neck, hips, legs, and knees.
Benefits
Avoid these errors to get the most from this exercise and avoid strain.
Going Too Fast
This exercise is meant to be done slowly, vertebra by vertebra, with control. Doing it with any speed will not allow you to feel the connection.
Raised Shoulders
Be sure that your shoulders are relaxed. Release the tension and get used to this feeling as it is essential for good posture. You might want to review your Pilates posture.
Forcing the Stretch
Do not force yourself to go lower than is comfortable. This is not a toe touch. Only roll as low as you can without the hips leaving the wall and without strain.
Safety and Precautions
Stop if you feel any pain during this exercise. Roll only as low as you can do comfortably while keeping contact with the wall. As this exercise involves a slight inversion, discuss it with your doctor to see if it is appropriate if you have glaucoma or high blood pressure. Stop if you feel lightheaded or dizzy.
Plank Pose Exercise

Targets:
Secondary muscles in your shoulders and chest as well as your quads and glutes.
Level: Advanced
The plank is the most intense and difficult to hold especially if you are in pain. Knowing that, take caution when performing this exercise and know that there are plenty of other previously mentioned. stretches and exercises to work on before attempting this one.
Challenge Yourself
For a more dynamic and functional workout, we recommend doing Commando Plank which will engage your arms as well. Other great dynamic plank positions are Buzz Saw Plank, Plank Walkouts and Plank with Arms and Leg Raises.
 |  | |
If you want to include more cardio, you can do Plank Jacks, Plank Frog Jumps or Plank with Side Jumps.

Step-by-step directions
Repetitions:
Do this pose for 2 sets of 12 reps.
Get a well rounded workout
To work all sides of your abdominals, try side plank variations that require more balance and work additional muscle groups in the core. Side Plank and Side Plank Crunches are great ones to start with!
